
Browse docs
Mobile Dyno
Mobile Dyno is available in sky_mechanicjob. Set up a complete workshop test bench, connect a vehicle, and follow its performance on the workshop tablet, the built-in control panel, and a separate result monitor.
Run your first test
Your server must enable Mobile Dyno for a configured mechanic job. Go on duty before operating it when the duty requirement is enabled, as it is by default.
- Set up the station. Use an existing workshop unit or place the
mobile_dynoinventory item on a hard, level surface. Leave room for the ramps, vehicle, and operator. - Add a result monitor. Place
mobile_dyno_monitornear the bench if you want a separate display. The tablet and built-in panel can operate the test without this extra monitor. - Connect the vehicle. Open the tablet's Dyno app, select the nearby station and vehicle, choose a Test profile, and select Connect vehicle. You can also use the bench's control panel.
- Align the driven axle. Position the vehicle on the rollers and follow the alignment display until it reads Aligned. The vehicle must be stationary and correctly oriented.
- Prepare the run. Switch on the cooling fans and complete the displayed checks. Select Arm station, then Start test.
- Watch the measurement. Stay within the station's operating area while the profile runs through its stages. After the run and cooldown, review the completed result before resetting or disconnecting the session.
Connecting a vehicle reserves a session; it does not start the measurement. Arm station confirms readiness, and Start test begins the countdown.
Dyno features
Open a feature for its controls and examples. Select an image to view it at full size.
The mobile unit combines a detailed metal platform, drive-on ramps, animated rollers, twin cooling fans, and an industrial control console.
Place the bench where the full footprint can rest on hard, level ground. Asphalt and concrete are suitable; slopes, uneven ground, and soft surfaces can prevent placement. Leave the fan controller and console accessible.
With item placement enabled, the default items are:
| Item | Purpose |
|---|---|
mobile_dyno | Places the test bench. |
mobile_dyno_monitor | Places a separate performance display. |
The default setup consumes the placement item and returns it when the prop is packed away. Placed props are not persistent by default; administrators can enable persistence in the server settings.
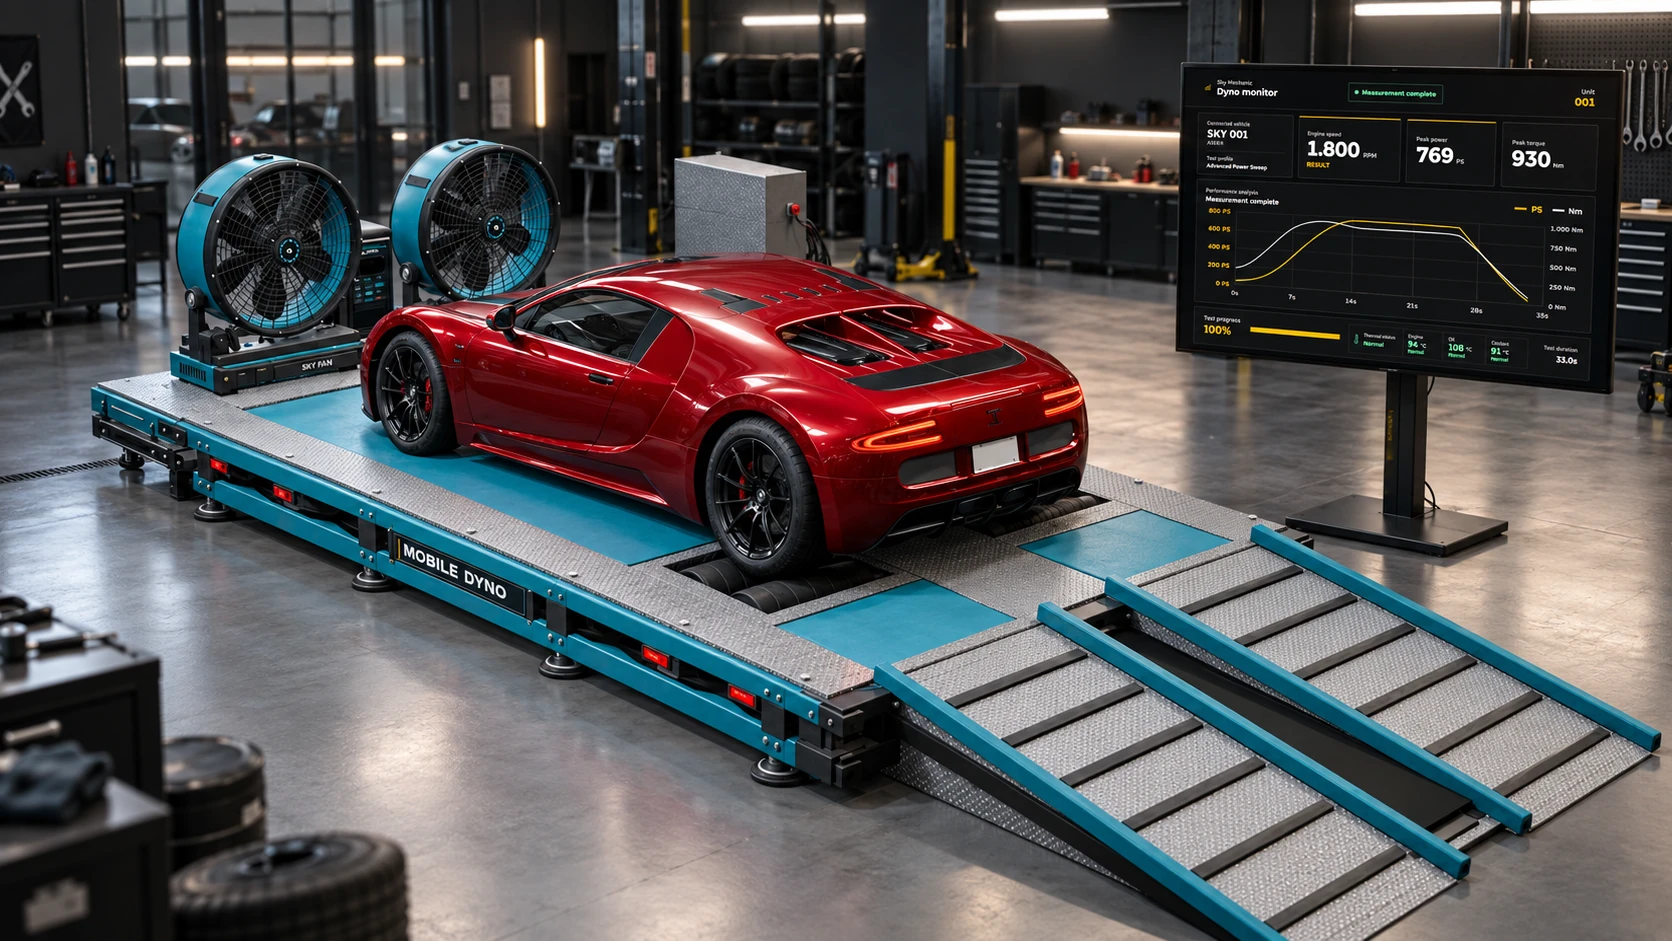
Illustrative workshop setup.
The Dyno tablet app brings station selection, vehicle connection, test profiles, live measurements, cooling controls, alignment, and readiness checks into one workspace.
Use the main action button to move through Connect vehicle → Arm station → Start test. Its label changes with the session. Once a run starts, the selected vehicle and profile remain visible alongside the current stage and progress.
The physical console provides an alternative way to operate the same session. With the default controls:
| Key | Action |
|---|---|
| E | Confirm the next setup step, or reset a completed or faulted session. |
| Left / Right | Select a test profile during setup. |
| Up / Down | Adjust the enabled cooling fans. |
| G | Activate the emergency stop. |
| R | Abort the current run. |
| Backspace | Disconnect the session and release the station. |
Stand beside the bench and outside the vehicle to use these panel shortcuts. Use the on-screen prompts if your server changes the bindings. Backspace disconnects the session; use it only when you are ready to release the station.
Only the session operator can change its normal controls. Another mechanic cannot take over a bench that is already reserved by an active operator.
Choose the profile before starting the run. Each profile follows a defined sequence of warm-up, load, and recovery stages.
| Profile | What it does | Useful for |
|---|---|---|
| Advanced Power Sweep | Warms up, ramps power, holds full load, and coasts down. | An overview of the vehicle across a complete test cycle. |
| 15s Full Load | Ramps up, holds full load, and recovers. | Watching sustained output and heat under load. |
| Steady-State Hold | Ramps to a fixed operating point, holds it, and recovers. | Observing output and temperature at a steady load. |
| Extended Coastdown | Ramps up and follows a longer coastdown before recovery. | Following the vehicle through the coastdown phase. |
15 seconds refers to the default full-load stage, not the entire test. Warm-up, ramp, and recovery add to the total duration. Administrators can change the full-load duration through the server settings.
For useful before-and-after testing, keep the vehicle, test profile, cooling settings, and starting temperatures consistent. Record a baseline before changing the tuning.
The live views show engine speed, power, torque, test progress, and temperature information. The tablet and console also expose load and readiness information appropriate to their layouts.
A separately placed monitor links to the nearest station within its configured range. It displays the current measurement and keeps the completed result visible while that result remains in the station session. If it shows No dyno linked, move it closer to an available bench.
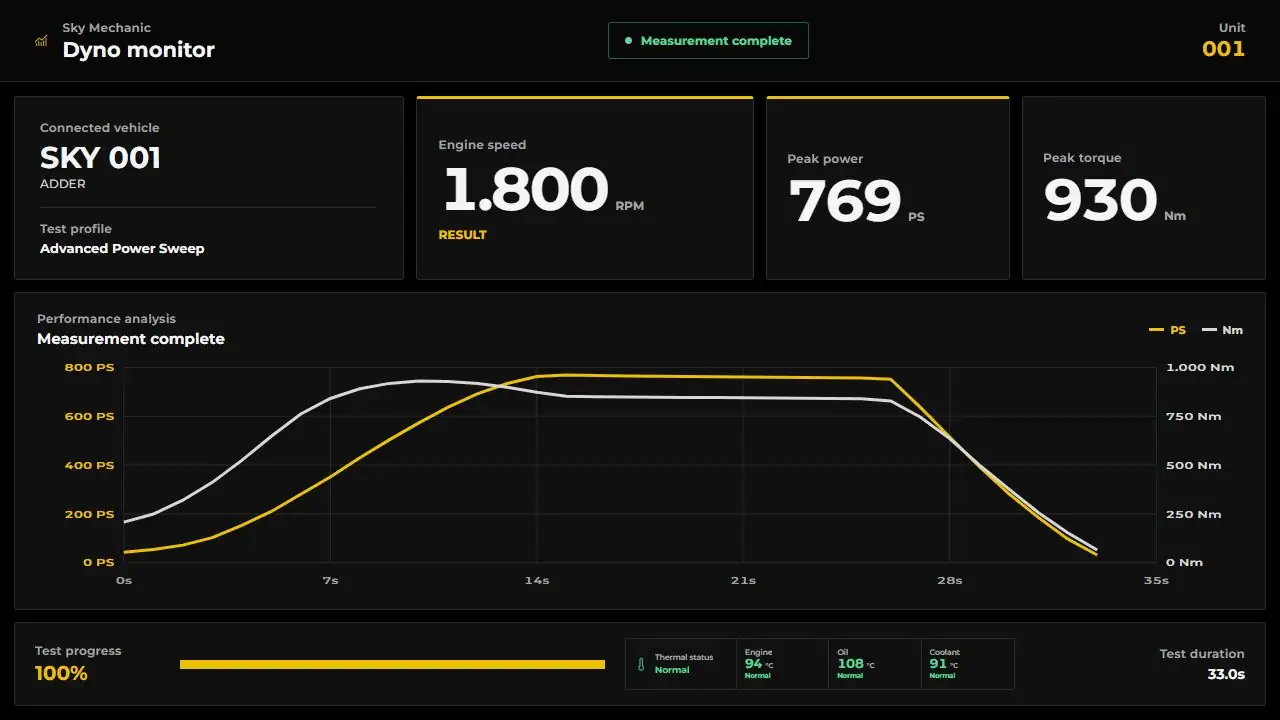
Read the result monitor
- Vehicle and profile identify the setup being tested.
- RPM shows engine speed; the power and torque cards show live output or completed peak values.
- PS is metric horsepower; Nm is torque. Each curve has its own labeled scale.
- The horizontal graph axis shows elapsed test time, so the curves follow the stages of the selected profile.
- The footer shows progress, engine/oil/coolant temperatures, and test duration.
The image below shows an example completed run in the current monitor interface.
Before arming the station, the readiness list checks that the vehicle is present, aligned, stationary, supported, and healthy enough to test. It also checks temperatures and that the cooling fans are enabled.
Switch the fans on from the available controls and adjust their speed between 35% and 100%. Fan speed can be adjusted during a run; switching the fans off is locked during countdown, measurement, and cooldown.
Engine, oil, and coolant temperatures respond to load and cooling. A hot vehicle can lose output, prevent another test from starting, or cause an automatic stop at a critical temperature. Keep the fans running and wait for a normal temperature state before resetting a hot session.
Use Abort to end a run or Emergency stop when an immediate stop is needed. Leaving the operating area, losing vehicle alignment, or a critical engine condition can also stop the session. Read the displayed reason and correct it before retrying.
After a successful run, the tablet summarizes peak power, peak torque, powertrain health, run stability, and time at full load. The graph and temperature readings help explain how the vehicle behaved through the test.
Completed runs are recorded in the vehicle's history under its plate, including the profile, curves, duration, and temperature information. Resetting the current session prepares another test; it does not remove a previously recorded history entry.
Reset session starts the preparation for another run on the connected vehicle. Disconnect session releases the station. Let the test finish and review the result before disconnecting if you still need the live monitor view.
The dyno evaluates the vehicle's current setup. To change handling values, use the administrator Handling Editor, then return for another test.
Server settings
With the Job Configurator enabled, manage the Mobile Dyno feature and its operator-facing settings through /jobconfig. These include item names, item consumption and return, placed-prop persistence, duty requirements, active-session limits, interaction/display distances, and full-load duration.
When the Job Configurator is disabled, use Config.ToggleFeatures.mobileDyno in config/config.lua and Config.MobileDyno in config/adv_config.lua. See Configuration for the configuration lifecycle and Inventory Items when registering the placement items.
The model, screen alignment, animation setup, and thermal calibration belong to the supplied asset and simulation setup. They remain in the advanced Lua configuration; they are not normal operator controls.
Troubleshooting
| What you see | What to check |
|---|---|
| No nearby station or vehicle | Move within range, check placement, and use Reload in the tablet. |
| Placement is rejected | Choose hard, level ground with enough space for the complete bench. |
| The station will not arm | Read the pending checks; correct alignment, stop the vehicle, enable cooling, and check vehicle condition and temperatures. |
| Another operator controls the station | Have the current operator disconnect their session or choose another available bench. |
| A run stops with a fault | Follow the displayed reason, keep the vehicle and operator within range, and resolve the condition before resetting. |
| The monitor says No dyno linked | Place it nearer to the intended station and check the configured display range. |
| Output differs between runs | Compare profile, installed tuning, powertrain condition, starting temperatures, and fan speed. |