
Browse docs
Creator and Catalog
What the Creator is for
Open /drugcreator to configure the drug activities your server offers.
The catalog is your saved list of entries. Editing it does not give players equipment, stock, or property.
For access, see Permissions.
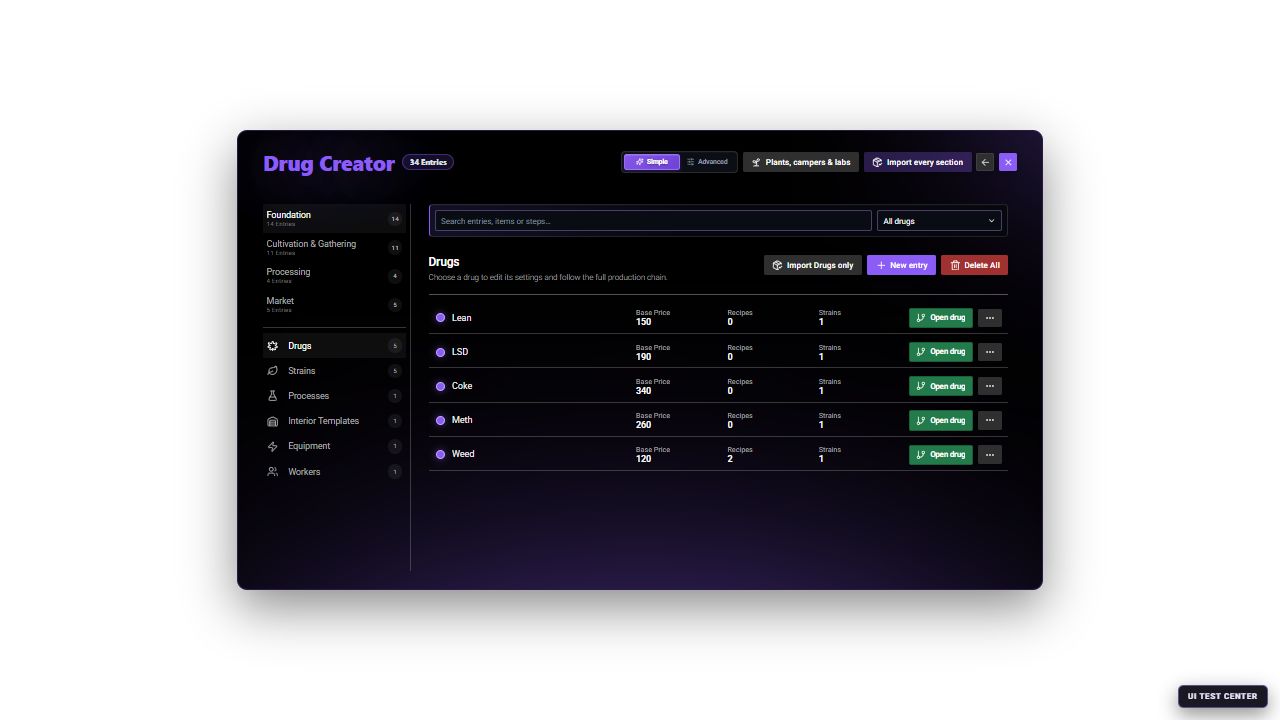
- Choose a group: Foundation, Cultivation & Gathering, Processing or Market.
- Select a section below it. For recipes, choose Foundation → Processes.
- Open an entry by selecting its name or Edit. The smaller text under the name is its ID, useful when labels have been renamed. Select the image to enlarge it.
The counters beside each group and section show the currently loaded catalog, not a fixed product limit. Import every section restores or updates the supplied catalog; it is not the normal way to save one edited entry.
Choose Simple or Advanced mode
The Creator detail level switch is available in every Creator section.
| Mode | Best for | What you see |
|---|---|---|
| Simple | First setup and ordinary balancing | Essential fields; recommended hidden defaults for new equipment, workers, processes, and strains |
| Advanced | Exact IDs, limits, risks, process steps, stock, and ownership rules | Every available field; compatibility default for existing installations |
Changing the mode does not delete saved advanced values. Simple mode only hides them. If an existing entry needs attention in a hidden field, the Creator opens Advanced mode automatically.
All 18 Creator sections support both modes:
Drugs, Strains, Processes, Interior Templates, Equipment, and Workers define the reusable building blocks referenced by the other sections.
Drug Fields and Wild Plants create material sources. Mobile Cultivation contains pocket recipes that do not require a world processing point.
Laboratories and Campers are player-operated facilities. World Processing places a single assigned recipe at a public prop, NPC, or marker.
Camper Shops, Labor suppliers, Street Sales, Buyers, Dealers, and Sale Routes control acquisition and distribution.
Choose what you want to change
| Your goal | Open this Creator section |
|---|---|
| Change a product's price or effects | Foundation → Drugs |
| Change seeds or plant growth | Foundation → Strains |
| Place a collection area and choose its harvest | Cultivation & Gathering → Drug Fields or Wild Plants |
| Change required materials and the result | Foundation → Processes |
| Place a table, NPC, or marker for processing | Processing → World Processing |
| Add a small recipe players can make without a table | Cultivation & Gathering → Mobile Cultivation |
| Add a property for players to buy | Processing → Laboratories |
| Change a laboratory's room layout | Foundation → Interior Templates |
| Define machines or staff | Foundation → Equipment or Workers |
| Sell equipment, tools, and materials to players | Market → Labor suppliers |
| Define a mobile laboratory and sell it | Processing → Campers, then Market → Camper shops |
| Change street-sale interactions or buyer preferences | Market → Street Sales or Buyers |
| Configure dealers or deliveries | Market → Dealers or Sale Routes |
A strain is a plant variety. An interior template is a configurable laboratory room layout. Campers currently use the fixed Drug Wars Lab interior instead of selecting one of these templates.
These are the English menu names. Mobile Cultivation is the section for pocket recipes, such as rolling a joint; use Strains to configure planted seeds.
Edit and save an entry
Open the correct section
Choose the group and section above, then select an existing entry or New entry.
Choose the detail level
Select Simple for a normal first setup or Advanced for the complete form.
Verify identity and status
In General, check the name and enabled state. Keep an existing entry's ID unchanged.
Configure the feature
Open the relevant tabs, such as Recipe and result for a process or Supplier products for a supplier.
Save and verify
Save, reopen the entry, and confirm your values remain. Then test the activity as a normal player.
Understand the entry editor
Every editor is divided into named sections instead of one long form. The exact sections depend on the entry type.
| Entry | Main editor sections |
|---|---|
| Drug | General, Market, Quality, Consumption Effects |
| Strain | General, Growth and genetics, Finished item, Consumption Overrides, Interaction |
| Process | General, Recipe and result, Quality and risk, Presentation, Process Steps |
| Drug Field | General, Harvest, Quality, Map display, Positions |
| Wild Plant | General, Plant and harvest, Spawn behavior, Positions |
| Mobile Cultivation | General, Pocket recipe, Crafting interaction, Reward and failure, Quality, Heat and police risk |
| Laboratory | General, Access and security, Capacity, Power, Ownership and economy |
| Camper | General, Vehicle, Interior, Access and robbery, Capacity, Power, Ownership and economy |
| World Processing | General, Process assignment, Delayed handoff, World presentation, Positions |
| Camper Shop | General, Presentation, Vehicle offers, Positions |
| Labor Supplier | General, Presentation, Supplier products, Positions |
| Street Sale | General, Interaction, Availability, Trade rules, Limits, Outcomes, Heat and police risk |
| Buyer | General, Demand profile, Tablet contact, Appearance, Budget and behavior, Contacts and special deals |
| Dealer | General, Tablet contact, Distribution, Trust and capacity, Recruitment, Dealer offers |
| Sale Route | General, NPC contacts, Route and cargo, Payout and risk, Drop-off and vehicle, Positions |
Interior Templates, Equipment, and Workers use the same section pattern but act as reusable building blocks. Laboratories reference interior templates, while laboratories and campers use compatible equipment and workers. Creating a machine does not automatically install it in an owned facility.
For a field-by-field build order, dependency map and complete examples, continue with Creator Workflows.
The easiest way to customize your server
Start with a supplied activity that already works. Change its location and price first, then test it as a player.
For a new production route:
- Decide how players obtain the material.
- Choose or create the recipe.
- Add every required material and tool.
- Choose the finished item and amount.
- Add the recipe to a processing location, or provide its machines in an owned lab.
- Make the tools and packaging obtainable.
- Test collection, processing, and selling.
Keep the internal IDs stable when editing existing content. Other entries may already refer to them. You can change a display name without creating a new ID.
Importing supplied content
A fresh database does not add the supplied Creator content automatically. Open Import Defaults, preview the available entries, select the connected content you want and run the import deliberately.
The exact starter IDs, items, prices, recipes, and stock rules are listed in Default Data and Items.
The import replaces matching supplied entries in the chosen selection. A global selection can affect more content than importing one section, and required dependencies such as Drug, Interior, Process and Camper definitions must be included or already exist.
Back up your database before using manual import on an established server. Do not use it as the first response to every missing interaction.
If you do not want an activity, disable or delete it deliberately. It returns only when an administrator later selects that matching entry in another default import; startup does not restore it.
Place and save an activity
Visit each location and check its position, heading, enabled state, and interaction options.
For territory-based wild spawns, select territories that exist on your server.
Save after using the placement tools. Moving something in the editor only updates the draft until you save it.
Check the item supply
Check the item names in each entry against Inventory Items. Missing-item warnings appear in the server console.
Make required items available through a supplier, shop, or reward.
Some inventories need additional setup or images. Follow Inventory Items, then test buying, using, and consuming the actual items.
Which settings take priority?
Use the Creator for individual activities and locations. Use /jobconfig for general options when it is enabled.
If a change appears to do nothing, reopen the saved entry first. A recipe's own duration or a saved shop price may still be different from the general default you changed.
Continue with Overview and First Setup for a complete example, or use Configuration and Settings to find the owner of a system-wide option.